Resumo : neste tutorial, você aprenderá como usar o after()método Tkinter para agendar uma ação após o tempo limite ter decorrido.
Introdução ao after()método Tkinter
Todos os widgets Tkinter possuem o after()método com a seguinte sintaxe:
widget.after(delay, callback=None)Linguagem de código: Python ( python )O after()método chama a callbackfunção uma vez após delaymilissegundos (ms) no loop principal do Tkinter.
Se você não fornecer o callback, o after()método se comportará como a time.sleep()função. No entanto, o after()método usa o milissegundo em vez do segundo como unidade.
Exemplo do método Tkinter after()
Vejamos o seguinte programa:
import tkinter as tk
from tkinter import ttk
import time


class App(tk.Tk):
    def __init__(self):
        super().__init__()

        self.title('Tkinter after() Demo')
        self.geometry('300x100')

        self.style = ttk.Style(self)

        self.button = ttk.Button(self, text='Wait 3 seconds')
        self.button['command'] = self.start
        self.button.pack(expand=True, ipadx=10, ipady=5)

    def start(self):
        self.change_button_color('red')
        time.sleep(3)
        self.change_button_color('black')

    def change_button_color(self, color):
        self.style.configure('TButton', foreground=color)


if __name__ == "__main__":
    app = App()
    app.mainloop()Linguagem de código:  Python  ( python )
O programa consiste em um botão. Ao clicar no botão:
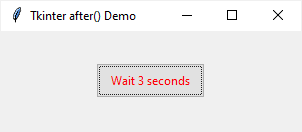
- Primeiro, a cor do botão fica vermelha.
- Então, o programa dorme por 3 segundos.
- Finalmente, a cor do botão fica preta.
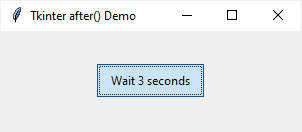
Porém, ao executar o programa e clicar no botão, você notará que a cor do botão não muda em nada. Além disso, a janela congela por 3 segundos assim:
O motivo foi que a sleep()função suspendeu a execução do thread principal. Portanto, o Tkinter não conseguiu atualizar a GUI.
Para corrigir o problema, você pode usar o after()método para agendar a ação que atualiza a cor do botão em vez de suspender a execução do thread principal. Por exemplo:
import tkinter as tk
from tkinter import ttk
import time


class App(tk.Tk):
    def __init__(self):
        super().__init__()

        self.title('Tkinter after() Demo')
        self.geometry('300x100')

        self.style = ttk.Style(self)

        self.button = ttk.Button(self, text='Wait 3 seconds')
        self.button['command'] = self.start
        self.button.pack(expand=True, ipadx=10, ipady=5)

    def start(self):
        self.change_button_color('red')
        self.after(3000,lambda: self.change_button_color('black'))


    def change_button_color(self, color):
        self.style.configure('TButton', foreground=color)
        print(color)


if __name__ == "__main__":
    app = App()
    app.mainloop()Linguagem de código:  Python  ( python )
Saída:
Por que usar o método Tkinter after()
Um programa Python pode ter um ou vários threads . Quando você inicia um aplicativo Tkinter, ele é executado no thread principal.
O loop principal do Tkinter deve começar no thread principal. É responsável por lidar com eventos e atualizar a GUI.
Se você iniciar uma tarefa de longa duração no thread principal, a GUI irá congelar e não responderá aos eventos do usuário.
Para evitar que uma tarefa de longa execução bloqueie o thread principal, você pode agendar uma ação que não será executada antes de um horário especificado usando o after()método.
O Tkinter executará o retorno de chamada no thread principal quando o thread principal não estiver ocupado .
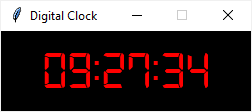
Um exemplo prático do método Tkinter after()
O programa a seguir exibe um relógio digital. Ele usa o after()método para atualizar a hora atual a cada segundo:
import tkinter as tk
from tkinter import ttk
import time


class DigitalClock(tk.Tk):
    def __init__(self):
        super().__init__()

        # configure the root window
        self.title('Digital Clock')
        self.resizable(0, 0)
        self.geometry('250x80')
        self['bg'] = 'black'

        # change the background color to black
        self.style = ttk.Style(self)
        self.style.configure(
            'TLabel',
            background='black',
            foreground='red')

        # label
        self.label = ttk.Label(
            self,
            text=self.time_string(),
            font=('Digital-7', 40))

        self.label.pack(expand=True)

        # schedule an update every 1 second
        self.label.after(1000, self.update)

    def time_string(self):
        return time.strftime('%H:%M:%S')

    def update(self):
        """ update the label every 1 second """

        self.label.configure(text=self.time_string())

        # schedule another timer
        self.label.after(1000, self.update)


if __name__ == "__main__":
    clock = DigitalClock()
    clock.mainloop()
Linguagem de código:  Python  ( python )
Saída:
Como funciona.
O método a seguir retorna a hora atual no formato de string:
def time_string(self):
    return time.strftime('%H:%M:%S')Linguagem de código:  Python  ( python )
O __init__()método usa o after()método para agendar uma ação que atualiza a hora atual no rótulo a cada segundo:
self.label.after(1000, self.update)Linguagem de código: Python ( python )No update()método, atualize a hora atual no rótulo e agende outra atualização após um segundo:
def update(self):
    """ update the label every 1 second """

    self.label.configure(text=self.time_string())

    # schedule another timer
    self.label.after(1000, self.update)Linguagem de código:  Python  ( python )
Observe que este programa usa a fonte Digital 7 do site 1001fonts.com
Resumo
- Use o método Tkinter
after()para agendar uma ação que será executada após o tempo limite ter decorrido - O retorno de chamada passado para o
after()método ainda é executado no thread principal. Portanto, você deve evitar executar tarefas de longa duração usando oafter()método.